Showing posts with label Tutorials. Show all posts
Friday, July 24, 2009
  • Digg
  • How To Transfer Your Blogger To Other Person

    0 comments
    Save to del.icio.us 0 hits!

    Based on above blog post title, i will show you how to transfer your blogger blog to other person... now please read carefully this post... just assume that you have blogger account AA and your friend as owner of Google account BB... get it?..ok steps below:

    1. You login into Blogger Account AA and invite your friend as an author to your blog (Navigate your mouse to settings > permissions).

    2. Your friend login into his/her email (Account BB) and accepts your invitation.

    3. You login into Blogger Account AA (Navigate your mouse to settings > permissions) and change your friend to an Administrator of your blog.

    4. Your friend login into Blogger Account BB and deletes you as an Administrator to your blog.

    5. Finally your friend as the sole Administrator to your blog in Account BB.

    Read more...

    These icons link to social bookmarking sites where readers can share and discover new web pages.
    • StumbleUpon
    • Technorati
    • Sphinn
    • Facebook
    • Mixx
    • Google
    • Furl
    • Reddit
    • Spurl
    Wednesday, June 3, 2009
  • Digg
  • Making Browse Category Navigation Address “Browse-Nav”

    0 comments
    Save to del.icio.us 0 hits!

    By adding the browse category navigation address into your blogger template, the reader can easily know the location of your . Now please see image below: example..

    browse_navigation

    To insert “Browse-Nav”, all you need with a few modifications of your template code. Please follow instruction below:

    1. Login into your blogger account.

    2. Click Layout.

    3. Click Edit HTML tab.

    4. Click on Download Full Template to backup your blogger theme.

    5. Now tick Expand Widget Templates and wait for a while.

    6. Search for this code below (Ctrl+F):

  • Copy and paste the code below exactly above the code ]]></b:skin>

    .browsenav {
    padding:5px 5px 5px 0px;
    margin: 0px 0px 15px 0px;
    font-size:95%;
    line-height: 1.4em;
    border-bottom:3px double #e6e4e3;
    }

  • Search the following code:

  • Copy and paste the code below exactly below this code <div class='post hentry uncustomized-post-template'>

  • Click Save Template.
  • Now please click on your post title to see something awesome..like it?..

    Read more...

    These icons link to social bookmarking sites where readers can share and discover new web pages.
    • StumbleUpon
    • Technorati
    • Sphinn
    • Facebook
    • Mixx
    • Google
    • Furl
    • Reddit
    • Spurl
    Sunday, June 29, 2008
  • Digg
  • Insert Embedded Script Comment Form Under Post

    0 comments
    Save to del.icio.us 0 hits!

    Recently, blogger.com features improve a lot and more function also available to use within your blogger platform. As a blogger users, comment form under post is all blogger or BlogSpot users dream and probably the most requested feature for Blogger. I'm sure many of you will want to use this straight away. Right?... ok don't worry.. i will teach your how to embedded script comment form under your post.

    Please take a look at below image: Double click it to enlarge.

    embedded_comment_form

    Below are the steps to get Comment Form under your Post:

    1. Login to with your blogger ID. Just remember, you should login to http://draft.blogger.com not to http://blogger.com because this feature is still in draft.

    2. Click Settings.

    3. Click Comments tab.

    • Go to Comment Form Placement and choose Embedded below post. Just look at picture below :
    • comment_form_placement
    • Press Save Settings.Done

    Now please click one of your post title. See something different? Your should be able to see your embedded comment form under your post. If not! please follow below steps:

    1. Click Layout tab.

    2. Click Edit HTML tab.

    3. Click Download Full Template. (Backup your blog template first!).

    4. Tick Expand Widget Templates.

    • Find below code like this:

    • Replace above code with this one :

    • Save Template. Done..

    Happy blogging!…

    Read more...

    These icons link to social bookmarking sites where readers can share and discover new web pages.
    • StumbleUpon
    • Technorati
    • Sphinn
    • Facebook
    • Mixx
    • Google
    • Furl
    • Reddit
    • Spurl
    Monday, May 26, 2008
  • Digg
  • How To Insert An Image Before Post Title Blogger Beta

    0 comments
    Save to del.icio.us 0 hits!

    Want your blog look cool like this? In this session i will guide you how to add an image before your post title..

    Add An Image Before Post Title

    Now before you attempting to follow this steps below. Please keep in mind to backup your template and !..


    Insert an image before post title steps:

    1. Login to Blogger with your ID.
    2. At dashboard page, click Layout.
    3. Click Edit HTML.
    4. Tick Expand Widget Template.
    • Find this code below:

    • Insert your image code like this :

      <a expr:href='data:post.url'> <img src="http://YOUR IMAGE LOCATION"/> &#160; <data:post.title/></a>

    • Now SAVE. Please see the result.
    Read more...

    These icons link to social bookmarking sites where readers can share and discover new web pages.
    • StumbleUpon
    • Technorati
    • Sphinn
    • Facebook
    • Mixx
    • Google
    • Furl
    • Reddit
    • Spurl
    Thursday, May 22, 2008
  • Digg
  • Blogger Archives Dropdown Menu Classic Template

    1 comments
    Save to del.icio.us 0 hits!

    Recently, there got one reader asking for help how to configured blogger archives drop-down menu for classic template just like below image:

    Blogger Archive drop-down menu

    Now don't wash time, i will show you how to tweak BlogSpot Classic Template with just a simple coding add-in. Please follow this steps:

    Note: Remember to backup your template and widgets before attempting to follow the steps below.

    1. Login to blogger with your ID.

    2. At dashboard, click Template.

    3. Click on Edit HTML tab.

    • Search for sidebar section and find this code :

      <BloggerArchives>
      <a href="<$BlogArchiveURL$"$gt;'><$BlogArchiveName$></a>
      </BloggerArchives>

    • Replace above code with this code :

      <select name="archivemenu" style="width:100%" onchange="document.location.href=this.options[this.selectedIndex].value;>
      <option selected>- Archives -</option>
      <BloggerArchives>
      <option value="<$BlogArchiveURL$>"><$BlogArchiveName$></option>
      </BloggerArchives>
      </select>

    • Save Change. Done..

    See the different? hope you like it…

    Blog till you expert….

    Read more...

    These icons link to social bookmarking sites where readers can share and discover new web pages.
    • StumbleUpon
    • Technorati
    • Sphinn
    • Facebook
    • Mixx
    • Google
    • Furl
    • Reddit
    • Spurl
    Monday, January 28, 2008
  • Digg
  • How To Add Search Engine Form To Blogger

    0 comments
    Save to del.icio.us 0 hits!

    By adding a search engine form in your blog of course will make your visitor easier to find the articles in your blog, for the reason hence opening the big opportunity of your articles will in reading by many visitors.
    How?… follow this step below:

    • Login to blogger with your ID.
    • At dashboard page , click Layout.
    • Click at Page Element tab

    layout

    • Click on Add gadget.
    • Click the sign plus ( + ) for HTML/JavaScript.
    • Copy and paste the following code into available column :

      <form id="searchThis" action="/search" style="display:inline;" method="get">
      <input id="searchBox" name="q" size="20" type="text"/> <input id="searchButton" value="Search" type="submit"/>
      </form>

    • Click Save button.
    • Done.

    Note:

    Explanation above code:
    size="20"
    This code is to arrange the wide of search box. You can change it according to desire, ever greater of his value of course more wide. Example : size="15", size="35"
    next..
    value="Search"
    You can change this word with your own word. Example : value="GO !"

    Try to search it!! here..

    Read more...

    These icons link to social bookmarking sites where readers can share and discover new web pages.
    • StumbleUpon
    • Technorati
    • Sphinn
    • Facebook
    • Mixx
    • Google
    • Furl
    • Reddit
    • Spurl
  • Digg
  • Insert Digg-It Button at Blogger

    0 comments
    Save to del.icio.us 0 hits!

    Digg.com? Digg.com is a most popular site on net. With digg.com you can discover and share your blog content all over country. Way to increase your blog traffic too. On this post i will guide you how to insert a digg it button at blogger platform. See image sample below:

    Howto digg it button

    How To Insert Digg-it Button?

    Please follow this step below:

    • Login to blogger with your ID.
    • At dashboard page , click Layout. Please see the picture :

    layout

    • click edit HTML tab. Please see the picture :

    edit html


    • Click the Download full template link. (backup your template).
    • Tick Expand Widget Templates. Wait for a moment.

    • Find This code like :

      <p><data:post.body/></p>

    • Delete the code above and replace with following code :

      <p>
      <!-- DIGG -->
      <div style='float:right; margin-left:10px;'>
      <script type='text/javascript'>
      digg_url = '<data:post.url/>';
      </script>
      <script src='
      http://digg.com/tools/diggthis.js' type='text/javascript'/>
      </div>
      <data:post.body/>
      </p>

    • Click Save Template button.Done…

    Note: Above step is for your original template without read more tag.

    For those who modified your template with Post summary (). Please follow this step below:

    <b:if cond='data:blog.pageType == "item"'>

    <style>.fullpost{display:inline;}</style>

    <p>
    <!-- DIGG -->
    <div style='float:right; margin-left:10px;'>
    <script type='text/javascript'>
    digg_url = '<data:post.url/>';
    </script>
    <script src='
    http://digg.com/tools/diggthis.js' type='text/javascript'/>
    </div>

    <data:post.body/>
    </p>

    <b:else/>

    <style>.fullpost{display:none;}</style>

    <p>
    <!-- DIGG -->
    <div style='float:right; margin-left:10px;'>
    <script type='text/javascript'>
    digg_url = '<data:post.url/>';
    </script>
    <script src='
    http://digg.com/tools/diggthis.js' type='text/javascript'/>
    </div>
    <data:post.body/>
    </p>

    <a expr:href='data:post.url'><b>Read More...</b></a>

    </b:if>

    Then, Save your template and done.

    Read more...

    These icons link to social bookmarking sites where readers can share and discover new web pages.
    • StumbleUpon
    • Technorati
    • Sphinn
    • Facebook
    • Mixx
    • Google
    • Furl
    • Reddit
    • Spurl
    Wednesday, January 23, 2008
  • Digg
  • Make a Post Title Table Of Content

    0 comments
    Save to del.icio.us 0 hits!

    What appear in your mind now about post title table of content? Let me tell you, with post title table of contents will make the reader easy to find the parts the content of a blog post wish to read. Do you understand now?.. Please see below image:


    Alright then, i will show you how to make a post title table of content. You only need play around with the XML CODE. Please follow the steps below:

    There got 2 parts:

    1st Part:

    1. Login to blogger with your ID.

    2. At dashboard page , click Layout.

    3. Then click edit HTML tab.

    4. Click the Download full template link. Backup your template (in case).

    5. Tick Expand Widget Templates. Wait for a moment. Image below:

    6. Go to your template code, Search this code below (Ctrl+F):

    • Erase above code, and replace with the following code :

    • Click Save Template.. Done…

    2nd Part:

    1. Click at Add a Page element.

    2. Click add to blog button for HTML/JavaScript.

    3. Copy and paste the below code into available column :

    • Click Save changes..done.. please see the result..

    Note:

    Please modify YourBlogName with your blog name.

    Modify 200 with other number that you want, because this is the sum of how much post want to show.

    Read more...

    These icons link to social bookmarking sites where readers can share and discover new web pages.
    • StumbleUpon
    • Technorati
    • Sphinn
    • Facebook
    • Mixx
    • Google
    • Furl
    • Reddit
    • Spurl
    Saturday, December 22, 2007
  • Digg
  • How To Change Blogger Template

    0 comments
    Save to del.icio.us 0 hits!

    For a new beginner like you, I'm sure that you will 100% searching a fresh template for your blog. Good news for you, i will design a blogger template in future post but not now..will let you know then..hehehe..for today post i will teach you how to change blogger template that you choose but before that important note:

    Make sure that you have to make a backup your old template. No idea how to backup your old template please read this from my previous posting on how to backup your template.

    Don’t forget to backup your widget too. For backup your widgets, please read this post on .

    Please follow the steps below : How to change blogger template

    1. Login to blogger with your ID.

    2. At dashboard page , click Layout > click edit HTML tab. Please look at image below :

    edit html

    3. Click Download full template link. to backup your old template:

    4. Click Choose File for your new template. and then click Upload button.

    A warning massage will appear. For example, the massage will show something like this :

    Widget are about to be deleted

    5. Then click Confirm & Save

    Now please see the result…

    Happy blogging to you…. see you on next post..

    Read more...

    These icons link to social bookmarking sites where readers can share and discover new web pages.
    • StumbleUpon
    • Technorati
    • Sphinn
    • Facebook
    • Mixx
    • Google
    • Furl
    • Reddit
    • Spurl
    Thursday, December 20, 2007
  • Digg
  • Setup a Post Summary For Each Blog Post(Read more Tag)

    0 comments
    Save to del.icio.us 0 hits!

    If you are a new for blog world, I’m sure you looking for blog tweak...Today i will teach you how to coding a Read More Tag. What is Read More Tag?.. not familiar right?.. ok…Read more tag is used to cut our post on blog, post will appear fully when we click read more link. You can see from below image:

    Double click image to enlarge

    Read More Function

    You can make a post summary function with add a little code to your XML template. But this code is for new blogger template (beta) and does not work at classic template.

    Please follow the steps below :

    Step #1:

    1. Login to blogger with your ID.
    2. Dashboard page , click Layout.
    3. Then click edit HTML tab.
    4. Click Download full template link. Backup your template (very important: How to Backup Your Blog Template).
    5. Tick Expand Widget Templates. Wait for a moment.
    expand widget templates
    6. Go to template code, and find the code like this (press Ctrl+F to find):
    • Erase the above code and replace with this code :

    • Click Save Template. Step #1 is done.

    Step #2:

    • Click Setting tab.
    • Click formatting tab.
    • Go to lower side. you will find a blank text are beside Post Template. Fill that blank text area with this code : Post template

    <span class="fullpost">

    </span>

    • Click Save settings and Step #2 done.

    How to make a posting using read more tag?

    When you want to post your article, choose tab Edit HTML
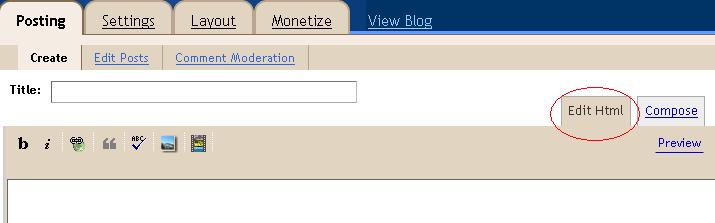
    Post edit html

    and you will see the code below :

    <span class="fullpost">

    </span>

    Place the first paragraph above of :
    <span class="fullpost">

    and place the rest of paragraph under of :

    <span class="fullpost">

    and above of :

    </span>

    and then publish your post. Done.

    Read more...

    These icons link to social bookmarking sites where readers can share and discover new web pages.
    • StumbleUpon
    • Technorati
    • Sphinn
    • Facebook
    • Mixx
    • Google
    • Furl
    • Reddit
    • Spurl
    Tuesday, December 18, 2007
  • Digg
  • How To Backup Blogger Widgets

    0 comments
    Save to del.icio.us 0 hits!

    Before you proceed to change your blogger template from old to new template, remember to backup your blog widgets too.. why? because all your data in page element will gone forever if you not backing up your widgets before you change your blog template to new layout.

    In this post, i will show you how to backup your widgets from page element:

    Please follow this step:

    • Login to blogger with your ID.
    • Click Layout.
    • Click edit Page Element, please see image below:
    • widget backup

    • Copy the code inside there, and paste to Notepad.
    • backup widget content

    • Repeat the step above at all page elements.
    • Done

    see you on next post…

    Read more...

    These icons link to social bookmarking sites where readers can share and discover new web pages.
    • StumbleUpon
    • Technorati
    • Sphinn
    • Facebook
    • Mixx
    • Google
    • Furl
    • Reddit
    • Spurl
    Saturday, November 24, 2007
  • Digg
  • How To Backup Blog Template

    0 comments
    Save to del.icio.us 0 hits!

    If you interested to replace new template or want to redesign your template, It is best way to backup your template before you changing any code. To prevent something goes wrong when redesign or changing your template..at least your have one solid backup ready. For you that did not yet know how to backup your template, please followed steps below :

    • Login to blogger with your ID.
    • At dashboard page , click Layout.
    • Then click edit HTML tab and then click the Download full template link, Save it anywhere you want..
    Now you had back up the template, if next time you needed xml file, you could use this restore back the template. However, backing up the template like steps above could not back up the data inside widget. How to back up the data widget? Follow me on next post.
    Read more...

    These icons link to social bookmarking sites where readers can share and discover new web pages.
    • StumbleUpon
    • Technorati
    • Sphinn
    • Facebook
    • Mixx
    • Google
    • Furl
    • Reddit
    • Spurl
    Friday, November 2, 2007
  • Digg
  • Setup a Blog At Blogspot Blogger

    0 comments
    Save to del.icio.us 0 hits!

    There're many of you who still don't understand about how to blog, and still wondering about blog. Don’t worry…I’ll try to review a little about blog here on my 1st blog posting.

    1. Blog, What it is?

    Blog (abbreviation from Web log) is sites which more dominant in private characteristic. This means, most of the content will be affected (realize or not) by the characteristic of the Blogger (Blog user) himself.

    Blog was made by the designers of the blog provider in order to work automatically and easily to be operated on, so for we that still was confused with the programming language to make one website still not the problem.If you could have made an email account in the internet, then in made blog then I was convinced you could.

    2. How to make a blog?

    As if when we start to make an ordinary email, we’ll need an account first, to make a blog. Because of that reason, feel please to register yourself in free blog provider. We can find a lot of free blog provider in internet, and some blog provider which really famous nowadays, are http://www.blogger.com, http://www.wordpress.com or http://www.typepad.com.

    In this chance, I’m going to review about make a blog in http://www.blogger.com Click the picture below to register

    Saw the picture below:

    Create a blog

    Create a blog 2

    After we arrive in Blogger.com, you will see picture like shown above. Now, follow my instruction.

    1. Click an arrow sign, inscribed with “CREATE YOUR BLOG NOW
    2. Complete the ‘e-mail address’ form, with your own email address (of course with the valid one).
    3. Rewrite your e-mail address in form ‘retype email address’
    4. Type the password as you wanted to. Type it in form, ‘enter a password’
    5. Retype your password in form ‘type password again’
    6. Type the password as you wanted to. Type it in form, ‘enter a password’
    7. Retype your password in form ‘type password again’
    8. Type the word which has shown, in form ‘word verification’. Click the white little square beside the sentence, ‘I accept the Terms of Service’.
    9. Click an arrow sign inscribed with “CONTINUE
    10. Write the title of your blog that you desire (you can change it later) in form ‘Blog Title’
    11. Type the name of your site in form ‘Blog Address (URL)’ .
    12. Type verification word which shown in form ‘word verification’. After that, click an arrow image inscribed with word, ‘CONTINUE’.
    13. Choose one template that you wanted to (You can change it later, if you want), then click again an arrow sign inscribed with word ‘CONTINUE’.
    14. Wait a moment. After you meet a sentence ‘Your blog has been created’. Click an arrow sign (again) which inscribed with “BEGIN POSTING’. Feel please to fill up your blog with everything you want to. After you finish with your first posting, just click the sentence, ‘PUBLISH YOUR POSTING’, Please write What you want, if being finished then click of the publish button.
    15. Finish.
    Read more...

    These icons link to social bookmarking sites where readers can share and discover new web pages.
    • StumbleUpon
    • Technorati
    • Sphinn
    • Facebook
    • Mixx
    • Google
    • Furl
    • Reddit
    • Spurl

    About Me

    Subscribe now!Feeds RSS

    Blog Directory

    Blog Directory